


The focusing system
Phase IV - Preparing the focusing system of bracket/mount/screws
Screw the specimen pin and the focus screw into mount
In Phase II, Leeuwenhoek made the mount and in Phase III, he made the screws. Next, he had to put them together. If the screws and holes were not threaded by this point, he would have to do so, making sure that they matched. Since the positioning screws of all the surviving microscopes are different, this matching of the products of a tap and die set was crucial.
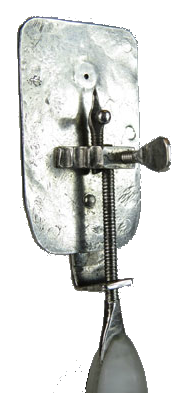
The image on the right (click to enlarge), shows in close-up where the focusing screw enters the mount on the 248x silver microscope pictured in three views at the bottom of the page.
Screw the positioning screw through the bracket and then into the mount
The side view below shows what happened when Leeuwenhoek used the little handle to turn the positioning screw. It turned in the L-bracket, which would tend to move the pin farther from or closer to the lens.
It also turned the mount, which was not attached directly to the body plates. If the focusing screw was not touching the plate, one of the ends of the mount soon would be, which would freeze the mount in that direction. The only direction it could move in would be along the body plates, either farther from or closer to the lens.
All but one of the surviving eleven is displayed with the pin very near the lens, as in the detail of this 248x silver microscope on the right (click to enlarge). However, Leeuwenhoek had no interest in looking at the lens. He wanted to see what was on the lens. It could have been a range of sizes and shapes. It depended on what about it that Leeuwenhoek was observing. This system gave Leeuwenhoek a great range of adjustability.
Screw the braking screw and nut through the bracket
This final step was temporary. In Phase V, Assembling the parts, it was this screw that finally attached the focusing system to the body plates containing the lens.
 |
 |
 |


